Upright Diamond for Creative Creases #77
 Thank you to everyone that helped us celebrate Creative Creases Third Anniversary! We had a fantastic turn-out with a record number of entries in the challenge. You’re all AWESOME! Our journey begins toward the fourth anniversary, starting now!
The fold I chose for today’s project is called an Upright Diamond Fold. It’s a new one for me. It reminds me of a graduation cap card I made years ago.
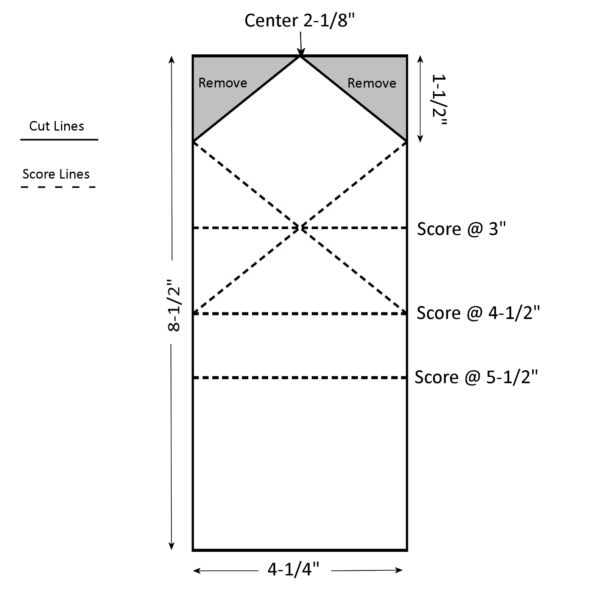
This fold is a little more challenging than what I’ve featured recently. I’ll do my best to explain it. You’ll find a template image with all of the card base measurements a little bit later in this post.
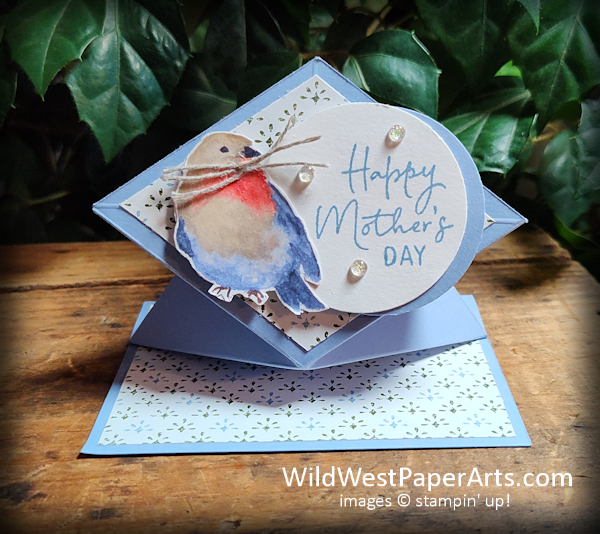
The Card Base is created from a piece of Boho Blue Cardstock, layered with Poetic Expressions DSP. The sweet little bird is fussy cut from the Flight and Airy DSP featured during Sale-A-Bration. She’s ready to build her nest with the help of a few strands of linen thread.
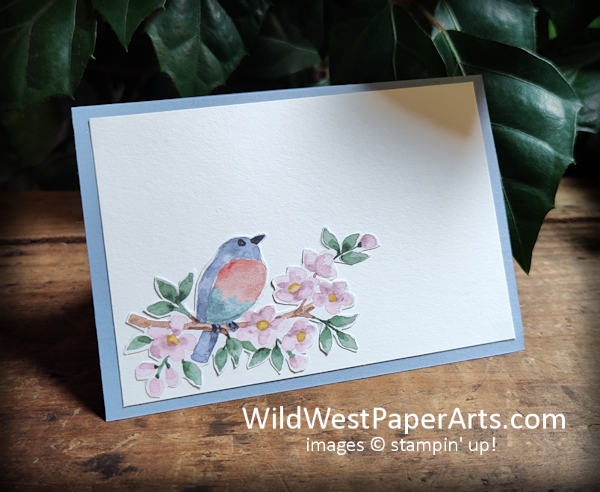
Room to write a short message is made possible by finishing the bottom of the card as shown in the photo above. This image is also fussy cut from the Flight and Airy DSP.
Nuts & Bolts
Paper Cuts:
- Card base: 4-1/2″ x 8-1/2″ cardstock. See diagram below for scoring measurements
- Writing Panel: 2-3/4″ x 4″ cardstock
- Poetic Expressions Designer Series Paper (patterned Paper): 3/4″ x 4″ (1 piece); 2-3/4″ x 4″ (1 piece); and 3″ x 4″ for top diamond (use diamond on template to create this piece)
- Circle Pieces: 2″ circles 1 each from Basic White and Boho Blue cardstocks
- Birds: Fussy cut from Flight and Airy Designer Series Paper
Construction:
- Make measurements as shown at the top of the card. Cut away sections marked “remove”
- Starting from the bottom of the diagram above, fold and burnish all scorelines as follows:
- Fold 1 – Mountain Fold
- Fold 2 – Valley Fold
- Fold 3 – Valley Fold
- Diagonals – Mountain Folds
- Pinch the sides under the diamond together to create the pop-up.
- Adhere DSP pieces to cardstock.
- Stamp greeting on Basic White Cardstock circle
- Offset Boho Blue cardstock circle and adhere to Circle in Step 4.
- Adhere as shown in photo with Stampin’ Dimensionals
- Adhere the bird with Stampin’ Dimensionals and Liquid Glue
- Cut 3 small pieces of Linen Thread and glue it to the bird’s beak.
- Create the Writing Panel by gluing the 2-3/4″ x 4″ Basic White Cardstock to the bottom of the card base. Embellish with fussy cut birds and adhere with liquid glue.
Download your free template here
Don’t forget to enter our current challenge!
Click to enter Creative Creases #77

Have a wildly creative day!
Upright Diamond Fold Product Showcase:

I am so glad that you tell us the measurements of the cuts!! I want to make this beautiful card!!!
Thank you Paula! Let’s talk about a time to do that.
Again, thank you for sharing the tutorial on this beautiful card.
Thank you Judy!
Beautiful card.
Thank you Kathie. You’ll be making this one soon.
This is just beautiful!!! Thank you for sharing it!!
Thank you Paula.
Beautiful Diamond fold card, Rae! I love that you used the Flight & Airy DSP for the focal point. I will miss this paper!! Hope you have a great weekend, my friend!
Thank you Debbie. I’m so glad I earned more than one package of this. Stay warm, my friend.