Pull-Out Fold with Stampin’ Up! Demonstrators June 2024
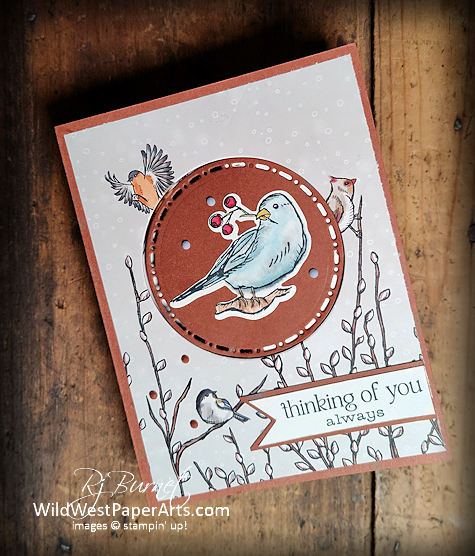 Welcome to the June 2024 Fun Folds Blog Hop with Independent Stampin’ Up! Demonstrators. We’re so glad you stopped by.
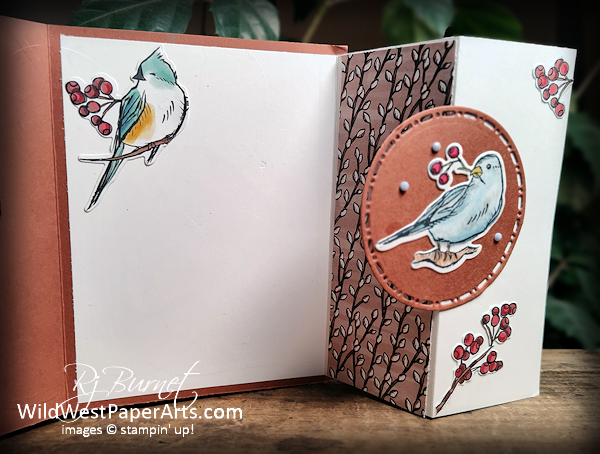
The fold is called a Pull-Out Fold. It’s been around a while but it’s my first time giving it a go.
The Stampin’ Up! Suite I’m using (Nests of Winter) hasn’t been released yet and was only available for a Stampin’ Up! Demonstrators that participated in an event called Creativity Now this last weekend. Don’t worry, it will be available soon.
Nests of Winter Suite Release Schedule:
- Stampin’ Up! Demonstrator Preorder-August 2024
- Customers- September 2024 in the upcoming holiday mini-catalog.
If you like little birds, wood and nature, you’ll love this suite.
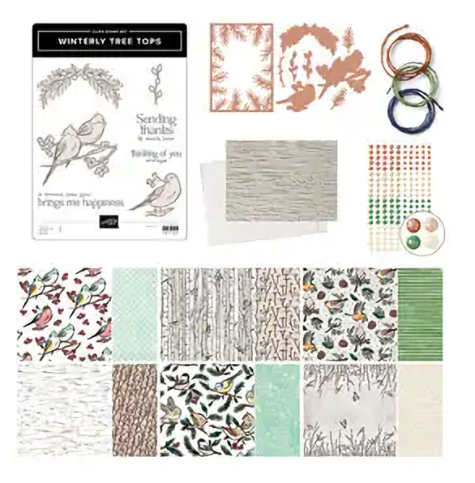
Nests of Winter Suite
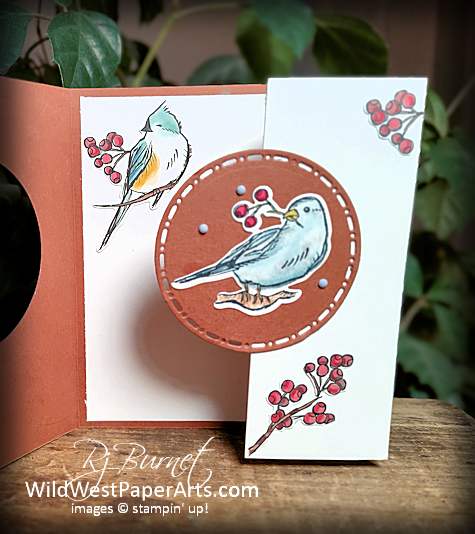
Let’s take a closer look at this special fold.
 |
 |
Nuts & Bolts
Paper Cuts
- Card base – Copper Clay Cardstock – 5-1/2″ x 8-1/2″; score at 4-1/4
- Inside Folded Base Layer – Basic White Cardstock – 5-1/4″ x 8″, score at 4″ & 6″
- Front Layer – Designer Series paper (DSP) 4-1/4″ x 4″
- Inside layer – 1-78″ x 5-1/4″
- Focal Piece – Basic White 4″ x 4″
- Banner Piece – Basic White 3/4″ x 3″
- Banner Mat – Copper Clay 1″ x 3-1/4″
- Additional Decorations – DSP cut-outs
Construction
- Fold and burnish the card base with your bone folder
- Adhere the Front Layer of DSP to the card base with liquid glue
- Die-cut a circle through both layers of the card front. See photo. Set the circles aside
- Fold and burnish the “folded layer”
- Fold in half at the 4″ score line
- Fold the 6″ score line back on itself. You’ll now have a “Z-fold”
- Adhere the “Inside Layer” of DSP to the middle panel of this “folded layer”
- Adhere the “Inside Layer” to the “Card Base” with Stampin’ Seal Adhesive or Liquid Glue
- Stamp the small bird (or other focal image) on 4″x4″ Basic White. Color with Stampin’ Blends or other markers.
- Die Cut or fussy cut the image from Step 7. Adhere to the circle left over from Step 3.
- Close the card.
- Apply liquid glue to the right side of the “Inside Layer” panel showing through the die-cut whole created in Step 3.
- Adhere the focal piece created in Step 8
- Stamp greeting on Basic White banner piece.
- Snip left side to create a banner.
- Adhere to Copper Clay cardstock “Banner Mat”.
- Snip Copper Clay “Banner Mat” to match the “Banner Piece ” leaving a border. Refer to photo
- Adhere to card front
- Embellish the card with gems, additional images from the DSP and stamped images.
Coloring the Bird with Stampin’ Blends
- Start by stamping the image with Memento Tuxedo Black on Basic White cardstock.
- Color the bird and wings with Balmy Blue Light. Highlight some areas with Gray Granite Light.
- Use Gray Granite Light to color the highlight marks and the lower part of the body.
- Blend the colors together on the body with the Color Lifter. Lighten the wings (if desired) using the same Color Lifter.
- Shade areas with Balmy Blue Dark.
- Color the beak with Wild Wheat Light.
- Color the legs and branch with Bronze. Lift some of the color off the branch to lighten.
- Color berries with Cherry Cobbler, light and dark.
Coloring Tip: If colors are too dark, use your Color Lifter to “lift and blend”.
Even though this suite of goodies is not be available right now, practice on products you do have. This is fold is perfect to showcase so many things. Let your creativity run wild.
Thank you for taking a moment to leave a comment by clicking the image below.
Let’s see what the other hoppers have for us. Happy hopping!
Blog Hop Line-up
- Maria Jose Mench
- Karen Finkle
- Donna Walls
- Rae Burnet – Here you are in the Wild West!
- Tara Carpenter
- Beth McCullough
- Mary Deatherage
- Debbie Mageed
Thank you for stopping by today.

Make it a Wildly Creative Day!
 Pull-Out Fold Product Showcase:
Important Notes:
- “Nests of Winter” products are not available until: Demonstrators in August Preorder; Customers in Holiday Catalog September 2024.
- Products on sale may be in limited supply.


Gorgeous! This suite is going to be HUGE, I predict! Especially with wonderful cards like you’ve made for us today! Love!
Thank you so much Mary. I completely agree… this suite is SWEET!
Gorgeous card, the fold is one I need to try. And I cannot wait to get my hands on this suite, thanks for the inspiration!
Thank you Donna. It’s a beautiful suite.
Great fun fold. I love the birds
Thank you Joan!
This is so pretty, Rae! That is a beautiful suite! Your birds are lovely, and the papers are wonderful! What a great fun fold!
Thank you Carrie. I’m so glad I took the plunge!
I am so bummed now that I didn’t get the suite! This is a beautiful card! Thank you for sharing!
Thank you Maria. I love this suite and it’s earthy colors.
Love this paper and this set!!! I really like this fun card! Thanks for sharing it with us!
Thank you Paula!
Oh, you know how much I love this card, Rae! I can’t wait to play with this suite and show those little birdies how much I love them. The papers are beautiful, too! Once again, Rae, we have chosen the same fun fold to showcase. We are always on the same wavelength! Thanks for playing in the blog hop this month, my friend.
Thank you Debbie. You know what they say about great minds; or should we say “Great CREATIVE Minds”?