
Pals Blog Hop: Happy Birthday!
![]()
Welcome to the Stampin’ Pretty Pals’ Blog Hop!
This month’s theme is “Birthday Celebrations.” The Pals hope to inspire you with card ideas and paper craft creations using Stampin’ Up! products. Links to the participant’s blogs can be found at the end of each post to help you “hop” along!
Need a special birthday card in a hurry? Wildflower Birthday Specialty DSP can help you do just that. From the beautiful patterns to it’s die-cuts, it has everything you need. Well, almost. You’ll still need a stamp and some glue.
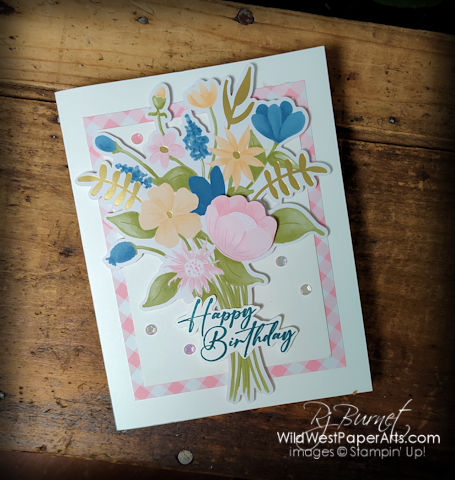
The bouquet on the front is a large die-cut from the paper pack. I love the colors. There are single flowers to make your bouquet 3D. Just add a little liquid glue to the bottom of a blossom and pop up the top with a dimensional like the image below. Voila!

What transforms a regular package of DSP to a Special DSP? Sometimes foiled accents, die cuts and vellum. In the case of Wildflower Birthdays it’s foil and die-cuts. One side of each sheet has foil accents while the second side is a beautiful design without the foil. Check it out below.
 |
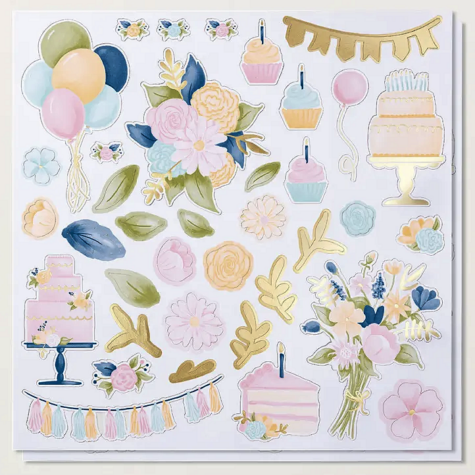 |
Wildflower Birthday Specialty DSP |
|
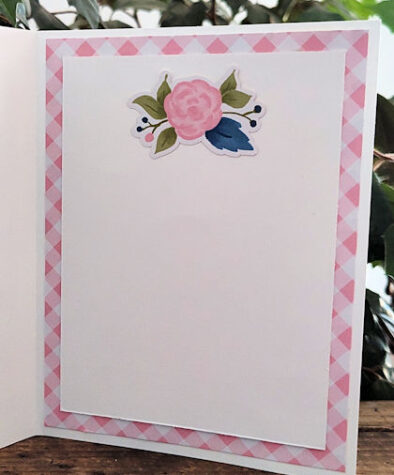
Don’t forget the inside! Gingham and a little blossom cluster is perfect to sweeten up the inside leaving plenty of room to write.
Let’s get started on your own beautifully easy birthday greeting.
Project Nuts & Bolts
Acronyms & Jargon
- CAS = Clean And Simple
- CASE = Copy And Share Everything
- CS = Cardstock
- DSP = Designer Series Paper (aka patterned paper)
- SDSP = Specialty Designer Series paper
- SIP = Stamp Paper Ink
Finished Size
- A2 (4-1/4″ x 5-1/2″)
Paper Cuts
- Card Base – Thick Basic White CS 5-1/2″ x 8-1/2″; score at 4-1/4″ on long side
- Outside
- Bottom Layer – Gingham DSP 3-1/2″ x 4-1/2″
- Middle Layer – Basic White CS 3″ x 4″
- Focal Piece – Large Bouquet Die-Cut plus Single pink matching die-cut bloom
- Inside
- Bottom Layer – Gingham DSP 4″ x 5-1/4″
- Writing Panel – Basic White CS 3-1/2″ x 4-3/4″
- Decoration – Small die-cut
- Miscellaneous
- Scrap for greeting
Construction
- Front:
- Layer and adhere Bottom and Middle layers to card base.
- Adhere bouquet with Dimensionals to the center of the card base. Adhere small single bloom over appropriate bouquet bloom with liquid glue and dimensional for dimension.
- Stamp “Happy Birthday” on Basic White with Pretty Peacock ink. Fussy cut around the phrase and affix with Dimensionals.
- Decorate with sequins or your choice of gems.
- Inside:
- Layer and adhere to card base.
- Adhere small floral die-cut to the inside top of the card.
Click to Download the FREE Tutorial
Before you go, please consider leaving a comment.
They make my day!
Click to Leave a Comment
We have more inspiration to share, so use the lineup below to visit each team member’s page for fresh ideas, unique styles, and endless inspiration. And get ready—next month, we’re designing for “The Male Room” theme, where we’ll be making cards for the men in our lives.
Until then, have fun in your craft space.
Stampin’ Pretty Pals Blog Hop
- Mary Fish at Stampin’ Pretty
- Mary Hanson at Up North Stampin’
- Karen Hallam at Karen’s Stamping Habit
- Lisa Ann Bernard at Queen B Creations
- Beth McCullough at Stamping Mom
- Stesha Bloodhart at Stampin’ Hoot
- Rae Burnet at Wild West Paper Arts —– There you are! I’ve been waiting for you.
- Debbie Mageed at Secrets to Stamping
- Su Mohr at Aromas And Art
- Tricia Chuba at ButterDish Designs
- Sue Jackson at Just Peachy Stamping
- Windy Ellard at Windy’s Wonderful Creations
Thank you for Hopping By!
Gorgeous card, Rae! I have the paper but haven’t done anything with it yet. Can’t wait to copy! TFS!
Thank you Donna. This one is SOOOOO easy!
Love your card, Rae! I hadn’t thought of popping up the small flower over the large one to create dimension. Thanks for that tip!
Thank you Karen.
A beautiful card front and inside, too!
Thank you Windy!
Beautiful, birthday bouquet, Rae! Love how you popped up the blossom!
Thank you Su!
BEAUTIFUL card!
Thank you Melinda. So easy too.