
Creative Creases #103: Inked Occasions Fun Fold
![]()
Welcome to Creative Creases Challenge #103
Anything Goes with a Fun Fold
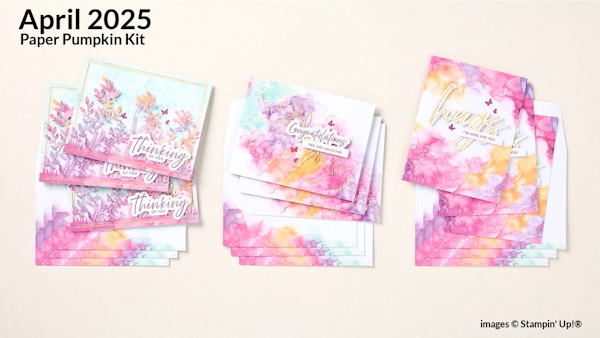
My project this month is a mini-gatefold mounted on a normal A2 card using supplies from the April 2025 Paper Pumpkin Kit, “Inked Occasions”.
Congratulations to all who submitted a project last month. It’s always fun to see the different folds you submit. You inspire us every day.
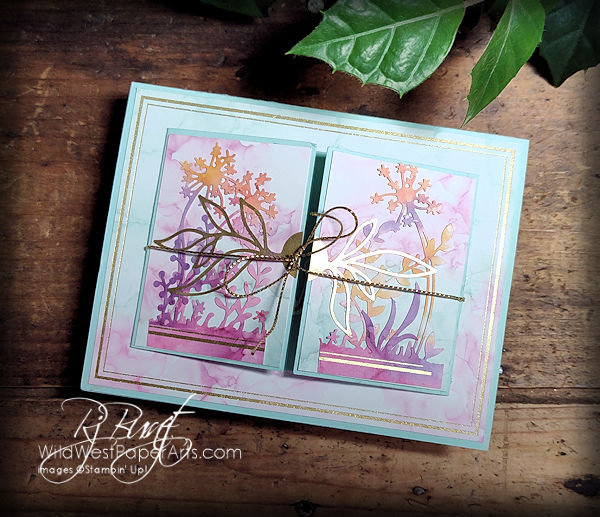
The colors and die-cuts in this kit are amazing on their own. Add Pool Party Cardstock and you get an entirely new look.
The opened gate reveals a sweet greeting. Inside the main card you’ll find a full panel to write a special message.
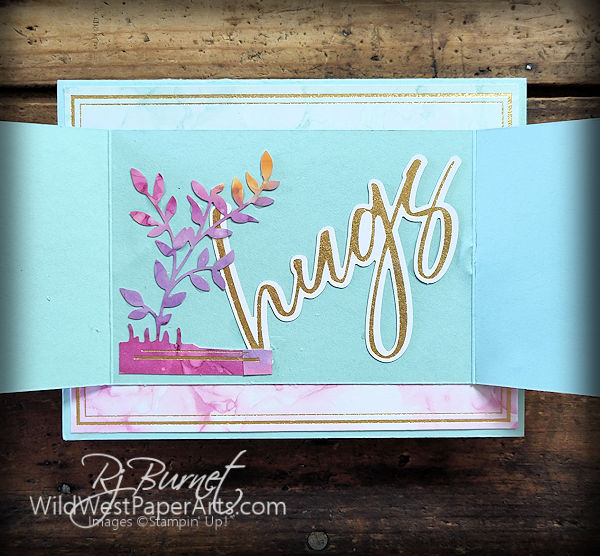
Opened Gate
What did I add to the kit? Only three things. Cardstock, gold cord and a couple of blunders!

Blunders!
What happened?
- Oops #1 (toward the bottom) – the piece was adhered with unforgiving adhesive and I didn’t like the gap.
- Oops #2 (on the right) – I forgot to attach a planned piece of cord and lifted up the edge.
Many times I design on the fly with very little planning. I can usually hide this type of goof. Not this time. Does this ever happen to you?
Pull it all together with a layered writing panel inside.

Card Inside
Nuts & Bolts
All measurements are in inches.
Finished Size – A2 (4-1/4 x 5-1/2)
Acronyms & Jargon
- CAS = Clean And Simple
- CASE = Copy And Share Everything
- CS = Cardstock
- DSP = Designer Series Paper (aka patterned paper)
- SDSP = Specialty Designer Series paper
- SIP = Stamp Paper Ink
Paper Cuts
- Cardstock –
- Pool Party – 5-1/2 x 8-1/2; score in half at 4-1/4) This is your card base.
- Pool Party – 3 x 8-1/2; score on long side at 2-1/8 from each end. This is your small gate fold.
- Fresh Freesia – 4 x 5-1/4
- Basic White – 3-3/4 x 5
- Front –
- Layer 1 – Front panel from Inked Occasions card front, trimmed to 4-1/8 x 5-3/8
- Gate Layers – Cut 2 pieces from left over pieces used for Layer 1. Each piece is 2 x 2-7/8
- Other Supplies –
- Gold Cord – Approximately 18 inches.
- Floral Die-cuts from the Paper Pumpkin Kit
- Gold Emblem and “Hugs” die-cuts from the Paper Pumpkin Kit
- Product Showcase – scroll to the end.
Construction
- Fold and burnish card base.
- Adhere Layer 1 to Card Base.
- Fold and burnish small gate fold. Adhere the “Gate Layers” to the front flaps.
- Cut apart some of the floral die-cuts. Arrange and adhere to the front flaps.
- Cut the gold die-cut in half and adhere over the floral die-cuts.
- Adhere the “Hugs” die-cut to the inside of the gatefold along with more of the die-cut flowers.
- Adhere the gold cord to the back of the small gatefold with Tear & Tape so there is the same length on each side. This will be used to tie the gatefold closed.
- Adhere the entire gatefold to the card front with Tear & Tape or Liquid Glue.
- Close the gatefold by tying the gold cord in a bow.
- Layer Fresh Freesia and Basic White Cardstock on the card inside.
Voila! You’ve just finished your Inked Occasions Alternate Card.

Sneak Peak Paper Pumpkin May 2025
Subscribe Today!
Before you go please consider leaving a comment. It means so much. Just click the link below.
Click to Leave a Comment
Time to play! Create a fun-fold and upload it to the Challenge Gallery.
Enter Creative Creases Challenge #103 Here
I can’t wait to see your creations!

Make it a Wildly Creative Day!

Shop 24/7!
Don’t forget…

Click to Earn!
I, like Debbie, have not opened my kit yet. This beauty (even with the goofs I wouldn’t have noticed) will be my first alternative that I make. I LOVE it! Have a blessed weekend.
Thank you Karen. Get that kit opened! It’s a great one.
Rae
Just love this card!!! I watched you make it, and you are so talented.
Thank you so much Paula. Speaking of talent…. your cup runneth over!
Such a beautiful gatefold, Rae! And mistakes are how you can tell a card is handmade, right?! Seriously, this is such a pretty card with those lovely spring colors! Have a crafty weekend! Hugs, Carrie
Thank you Carrie. I love to show my mistakes. Hopefully it will help the less confident to jump in with both feet. Have a great weekend.
Wow, you really made this gatefold shine with the amazing Paper Pumpkin kit this month. I haven’t even opened mine up yet – yikes! I love the bold colors, truly amazing kit. Hope all is well with you and you have a crafty weekend, my friend!
Thank you Debbie. These Paper Pumpkin kits get better with each month. Have a fantastic weekend.