
Fun Fold Blog Hop: Floating Autumn Panels
Welcome to the October, 2025 Fun Fold Blog Hop with Stampin’ Up! Independent Demonstrators. We’re so glad you landed here. After you’re finished with my post, don’t forget to leave a comment (link below) and hop through the list to see what inspiration you can find.

This Floating Panel fun fold is an easy and elegant gift card holder. Don’t need a gift card holder? Use the pocket to slide in a little note. There is nothing difficult about it.
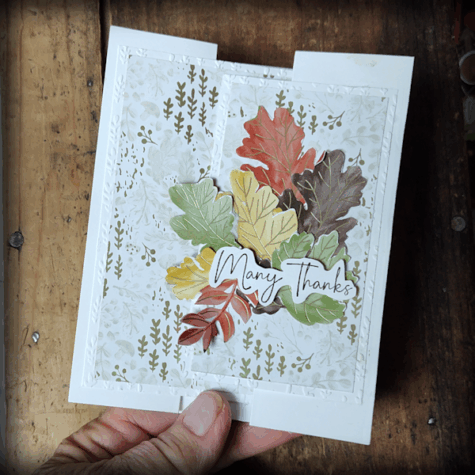
Gathering Together seems to be my niche this autumn. I’m obsessed with the rich colors and gold accents in this Specialty Designer Series Paper.
 Gathering Together Specialty DSP |
More to love about this specialty paper:
- Autumn Colors
- Leaves!
- Bold patterns
- More Leaves!
- Delicate patterns subtle enough for writing panels
- Even More Leaves!
- Plaids & Stripes
Have you ever created something that just doesn’t seem to be finished? This is that project for me. The left panel is too bare (in my opinion). I did add a few more overlapping leaves to the right panel which helped a bit. Unfortunately, deadlines needed to be met before I came up with a solution. More on that later.
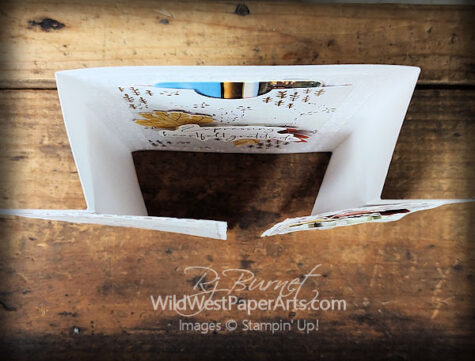
Floating Panel Card view from the top down.
Nuts & Bolts
All measurements are in inches.
Finished Size – A2 (4-1/4 x 5-1/2)
Acronyms & Jargon
- CAS = Clean And Simple
- CASE = Copy And Share Everything
- CS = Cardstock
- DSP = Designer Series Paper (aka patterned paper)
- SDSP = Specialty Designer Series paper
- SIP = Stamp Paper Ink
The Fold
- Card Base: 10-3/4 x 5-1/2
- Score: 1-5/8 & 3-1/4 on each end (on the long side)
The Panels
- Mats:
- Left Panel – 3 x 5
- Right Panel – 2-1/2 x 4-1/2
- Inside Center – 3-3/4 x 5
- Patterned Paper (DSP or SDSP):
- Left Panel – 2-3/4 x 4-3/4
- Right Panel – 2-1/4 x 4-1/4
- Inside Center – 3-1/8 x 4-1/4
Construction
- Score and burnish all folds.
- Dry emboss all “mats”.
- Gift Card Holder:
- Punch (or die cut) a half circle on the inside center patterned paper piece to allow for a gift card.
- Adhere to appropriate mat with dimensionals around the left, right, and bottom edge only.
- Affix remaining patterned paper pieces to appropriate mats. Affix to card panels.
- Adorn with leaves. These are fussy cut from the patterned paper.
- Stamp sentiments. Fussy cut and adhere with Stampin’ Dimensionals, inside and out.
“Bare Panel” solution. I think you’ll like it. However, due to deadlines, it will be posted tomorrow. That’s Wednesday, October 28, 2025.
Before you go please consider leaving a comment on the project today. I love to read them. It’s like digital “Happy Mail”.
Click to Leave a Comment
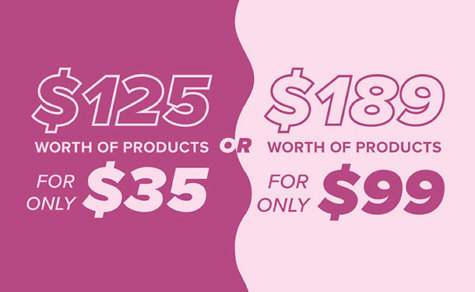
One more thing….. Did you miss the Stampin’ Up! Free Shipping special last week? Great new! You can still get free shipping and a fantastic deal with their two “Join Offers”. But ONLY in October, 2025. Click the graphics below for more information. Become a Wild West Crafter today.
Be a Wild West Crafter!
More Inspiration Awaits!
Visit the demonstrators below for more great projects.
- Debbie Mageed
- Michele Deschenes
- Karen Finkle
- Maria Mench
- Rae Burnet
- Su Mohr
- Beth McCullough
- Mary Deatherage
- Sue Jackson
- Tara Carpenter
- Lisa Ann Bernard
Thank you for visiting the Wild West.

Have a wildly creative day!
Product Showcase:
I love the added leaves to this beautiful card!
Thank you Candace.
Thanks for sharing your beautiful card, I truly appreciate the information so I can CASE it.
Thank you Cheryl
I love that you added the giftcard holder to the fun fold! Beautiful use of white alongside the fall colors!
Thank you Maria!
Beautiful card, Rae! I love the white with the colorful leaves!
Thank you Su. I struggled with the white at first. But then, I just started scattering leaves!
Such a wonderful card, Rae! Love this fun fold and the elegant paper. Who doesn’t need a gift card holder? Every kid (young and old) would love one. Thanks for joining the blog hop!
Thank you so much Debbie. A great blog hop, for sure!
WOW! beautiful card. Love everything about it.
Thank you Michele!
Whow! beautiful card!
Thanks a million!