
Fun Fold Blog Hop: Slats & Spokes
Welcome to the monthly Stampin’ Up!® Demonstrator Fun Folds Blog Hop, June 2026 edition. We’re so glad you’re here! Let our Fun Folds Blog Hop Designers inspire you to create your own masterpiece.
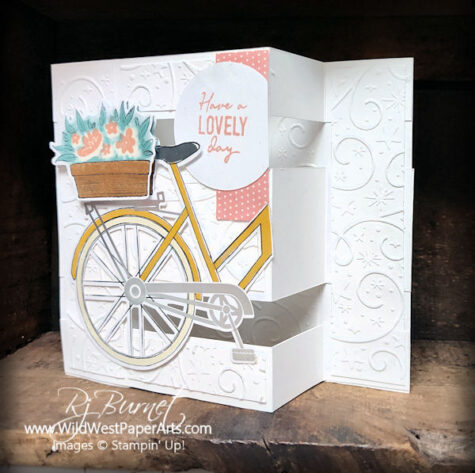
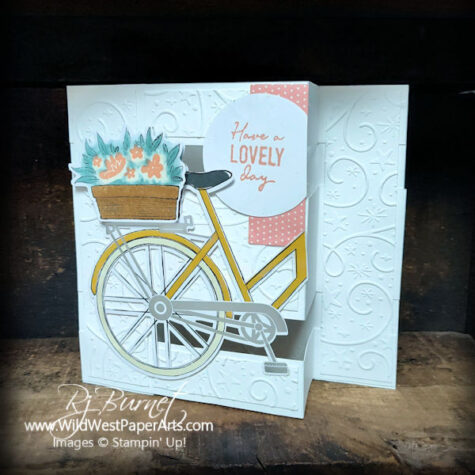
Today’s card features a Slatted Z-fold card made with July’s Paper Pumpkin Kit, “Bikes & Blooms”. You may have seen this fold under different names with two, three or four panels. The basic concept is the same. The template is easily altered to create the number of slats you would like.
Would you like a live tutorial on this card? See my announcement toward the end of this post. Follow the instructions and I’ll “Go Live!”
Speaking of alternates, this card is an alternate idea for the July Paper Pumpkin kit, Bikes & Blooms.
 Paper Pumpkin July 2026 – Bikes & Blooms |
 Paper Pumpkin July 2026 Refill – Bikes & Blooms |
#golive
A word about Paper Pumpkin Refills – Refills and add-ons for Paper Pumpkin Kits are only available to current Paper Pumpkin Subscribers. Not a subscriber? We can remedy that fairly quickly. You can cancel or suspend your subscription at any time. Click this link Subscribing to Paper Pumpkin to find out more.
 |
 |
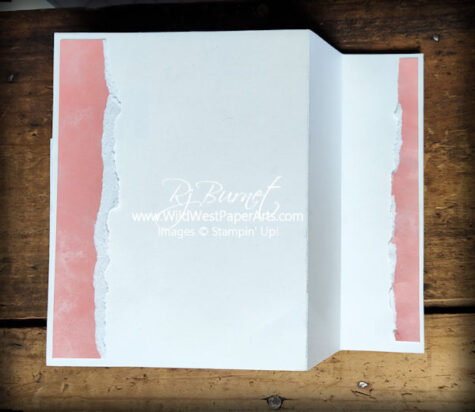
Many times you’ll see this fold celebrating beautiful DSP (patterned paper). I decided to keep the background white on white to keep the focal piece from getting lost. Embossing folders help make it interesting. The embossing folder is an upcoming Online Exclusive called Swirls of Magic. Watch for it in July.

Swirls of Magic Embossing Folder Available July, 2026
Don’t forget the writing panel. I took a card base from the kit, tore a few strips and glued them in place.
Nuts & Bolts
All measurements are in inches.
Finished Size – A2 (4-1/4 x 5-1/2)
Acronyms & Jargon
- CAS = Clean And Simple
- CASE = Copy And Share Everything
- CS = Cardstock
- DSP = Designer Series Paper (aka patterned paper)
- SDSP = Specialty Designer Series paper (specialty patterned paper)
- SIP = Stamp Ink Paper
Basic Paper Cuts
- Cardstock – 7-1/4″ x 9-1/2″; score at 1-1/2″ & 3″ on short edge
- Embossed Detail Pieces
- Inside background – 2-1/2″ x 5-1/4″
- Left & right vertical pieces – 1-1/4″ x 5-1/4″
- Horizontal strip pieces –
- Top and bottom horizontal strips – 3/4″ x 2-5/8″ (cut 2)
- Middle horizontal strip – 1-3/4″ x 2-5/8″ (cut 1)
- Writing Panel Torn Pieces
- 1″ x 5-1/4″ (cut 2)
Construction
- Cut the Base & Strips – See diagram below. Make sure you score the piece first (see cutting above).
- Fold and burnish.
- Emboss the detail pieces (or used DSP)
- Attach background detail piece.
- Attach strips.
- Attach remaining detail pieces.
- Decorate.
- Writing Panel – Tear the pieces, pulling toward you to reveal the white. Adhere to each side as shown.
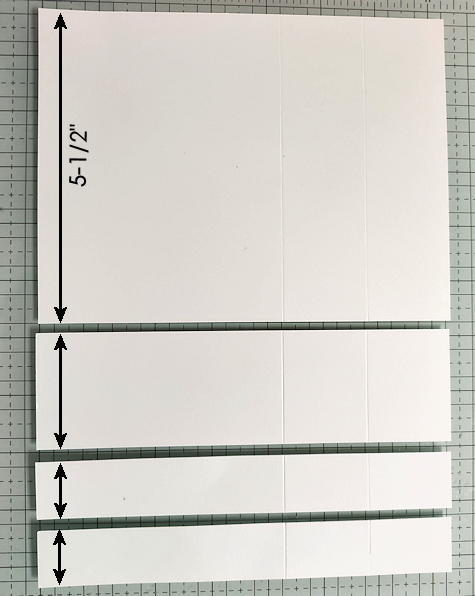
Cut your scored cardstock to these dimensions
Let’s put this card together Live!
I’ve been looking for motivation to join the virtual tutorial crowd. However, I need to know how many people will participate. If I can get at least ten interested crafters, I’ll go live! You’ll get to witness my very first virtual session with all it’s bloopers. If you know me, you know there will be plenty of those.
Here’s what you need to do.
- Comment on this post with the words “Go Live”.
- Watch your email for date, time and more information
- Pass it on! When I get a minimum of 10 “Go Live” comments on this post, I’ll schedule a Live Tutorial a few days after we hit the mark.
Click to leave a comment.
Make sure to visit the blogs below for more inspiration. I can’t wait to see what everyone has created. How about you?
SU Demo Fun Fold Blog Hop Lineup
Have a wildly creative day!


Click to shop 24/7!
Fantastic card, Rae! I’d love to watch you create this, so I’m another “Go live” to add to the others!
Thanks Carrie! I think we’re at 8 now.
Go live!! Sounds like fun!
Thank you Tamra. This makes 4 to Go Live!
Go live.
Thank you Ginny. Just 6 more to Go Live
Go live! This will be fun!
Thank you Celeste. I need 6 more to “Go Live”!
So nice !I’m loving these fun fold cards. Add such a variety to the process.
Thank you Ruth.
Go Live. Lovely card.
Thank you Jacqueline. One down, nine to go.
Pretty Z-fold card, Rae! I love how you showcased the bike in the Paper Pumpkin kit. It’s so big! The embossing folder is a great texture for the background. Thanks for joining the blog hop this month.
Thank you Debbie. Yes, that bike is really big. Great focal piece.