
Creative Creases #104: Grad Cap Spring Card
![]()
Welcome to Creative Creases Challenge #104
Anything Goes with a Fun Fold
First, a big Thank You to all who submitted a project last month. It’s always fun to see the different folds you submit. You inspire us every day.
Need a fun card for the graduate in your life? This project is for you. It can even double as a money or gift card holder.

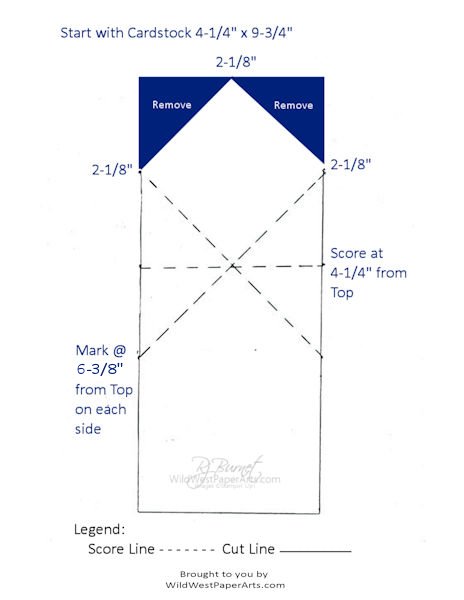
Don’t be intimidated by the diagram (below) for this fold. Once you make it, the next one will be a snap.
I made this card several years ago. At that time, I called it a Grad Cap Spring Card. Here are a few more names.
- Spring Fold
- Diamond Easel Card
- Diamond Pop-up
The structure is the same. However, there are a few changes this time around.
- Back Writing Panel
- Gift Card holder
- Stamps used
 |
 |
Nuts & Bolts
All measurements are in inches.
Finished Size – A2 (4-1/4 x 5-1/2)
Acronyms & Jargon
- CAS = Clean And Simple
- CASE = Copy And Share Everything
- CS = Cardstock
- DSP = Designer Series Paper (aka patterned paper)
- SDSP = Specialty Designer Series paper
- SIP = Stamp Paper Ink
Paper Cuts
- Cardstock –
- Dark Color – 2-1/2″ square (cut 1); 4-1/4 x 9-3/4 (cut 1), see diagram below for scoring. Plus small scrap for,
- Basic White – 2-3/4 x 5 (cut 2); 4 x 3-1/4 (cut 2)
- Other Supplies –
- Tassel
- Small circle punch
- Large circle or oval punch
- Product Showcase – scroll to the end.
Construction
- Make top corner cuts (indicated as blue triangles on template)
- Score all areas, fold and burnish. See video. Link included below.
- Stamp one small white square with inside greeting or image. This is the square inside the cap. Adhere.
- Stamp “Congratulations” or other greeting on the lower portion of the white rectangle. Punch a half circle or oval in the top of the white rectangle for the gift card or money holder. Adhere to base with Tear & Tape on sides and bottom only leaving the top open to insert the gift card or money.
- Option: Die Cut the word Celebrate or Congratulations instead of stamping.
- Adhere the second rectangle to the back of the card for your writing panel. Decorate if desired.
- Adhere the dark square to the second white square. Adhere to the top, outside of the card.
- Punch a small circle from the dark cardstock and adhere with a black mini-dimensional. Secure the tassel by winding it around this “button”.
Cute idea: Decorate the top of the hat like grads do before graduation.
Click to Download this as a PDF
Need a video? I found this one from Beth’s Paper Cuts. Click here —> Grad Cap Video Tutorial
Before you go please consider leaving a comment. It means so much. Just click the link below.
Click to Leave a Comment
Time to play! Create a fun-fold and upload it to the Challenge Gallery.
Click to upload your card now!
I can’t wait to see your creations!

Make it a Wildly Creative Day!

Shop 24/7!
Product Showcase:
Love, love, love this grad cap! I made one of these eons ago and had forgotten all about it. Mine did not have a pocket for a gift card or cash, and that’s a very cool addition! Now I think I need to make another one … thanks so much for the inspiration!
Me too Leslie. I thought it would be a good one to resurrect. Thank you.
Clever folding and creative ideas and look what you came up with. This is great and I’m sure a Grad would be thrilled to receive it.
Thank you Johanna!
Awesome!! Thank u so much 4 the directions!
You’re so welcome Pat. Thank you.
Oh – that is SO clever, Rae! Perfect for graduation and I love that it didn’t need a “special” die!! Boom!
Thank you Mary. Definitely evergreen!
Perfect fun fold for this time of year, Rae! Thanks so much for sharing all the measurements and instructions and even a video link!
Thank you Carrie and you’re welcome!
Great ideas for Grads! Thanks for putting up how to make & including a video.
You’re welcome Cindy. Thank you for commenting.
Awesome grad card!
Thank you for the detailed instructions!
Thank you Susan and you’re welcome!
Thank you for an easy to follow tutorial. Can’t wait to try this card.
You’re welcome. Thank you for commenting.
Great graduation card, Rae! This is one of my favorites for grads. Your tutorial really helps to see how easy it is to create, too. Have a wonderful weekend, my friend!
Thank you for commenting. Definitely a tried and true design.
What a darling card to make for a Graduate! Love this card!
Thank you Candyce.
This is the cutest card and the next time I need a grad card I will make this one! Thank you so much for putting the “How To’s” on your site!! Great card!!
You’re welcome, Paula. Thank you so much for commenting.